Cross Cube — An Unfolded Cube Puzzle#
A small confession: I have always been mildly curious about cube puzzles — officially known by the trademark Rubik’s Cube, and generically called twisty puzzles. But I never bought one because I could not solve it, and learning to solve it felt like one more thing to study in a life that already has plenty — so I kept walking past it.
Then one day a thought struck me: “What if the cube were unfolded, so all six faces are visible at once in 2D? Wouldn’t that be unique and fun?” I decided to build that idea as a widget, and while at it, to finally become someone who can solve a cube. That is how this widget came to be.
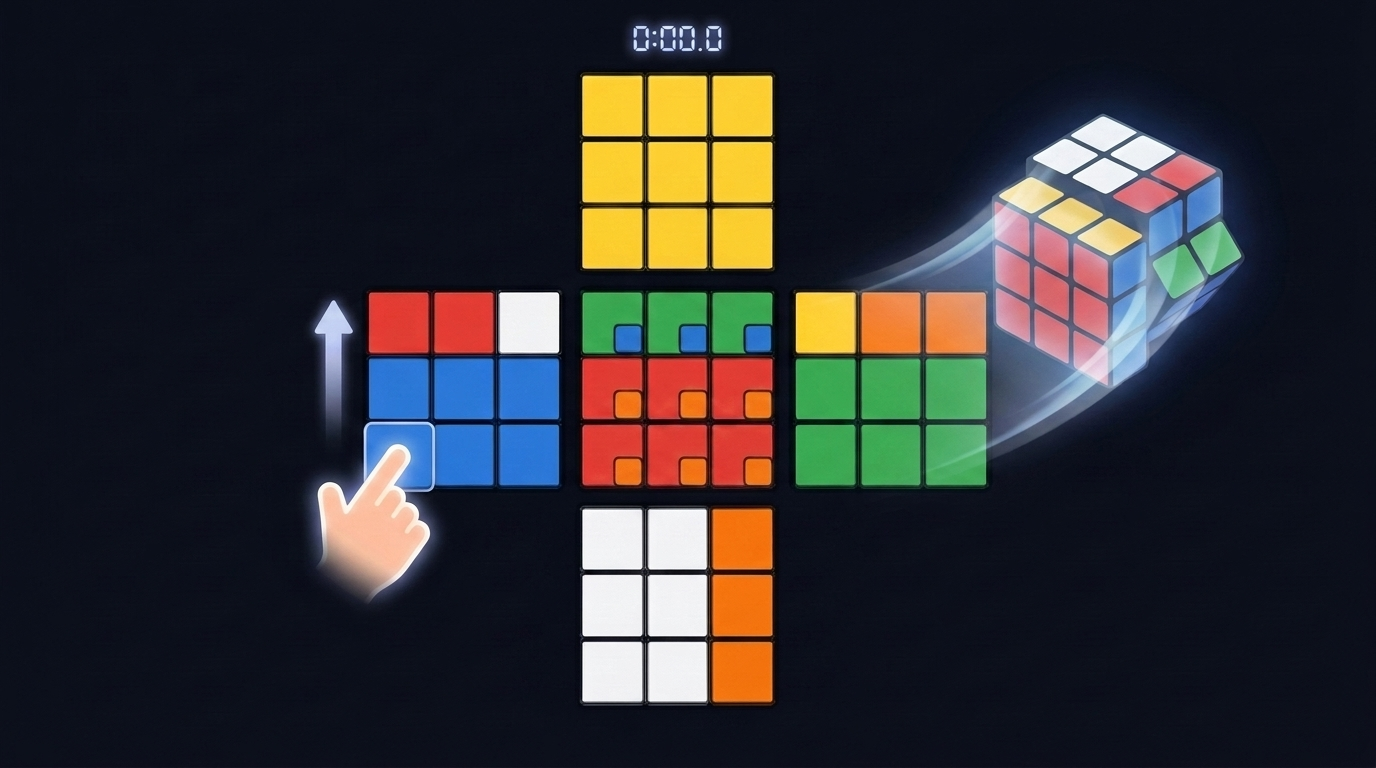
Cross Cube is a 2D cube puzzle that lays the 3×3×3 cube (Rubik’s Cube) flat in a cross (+) shape. Five faces — top, left, front, right, and bottom — are arranged as a cross, and the hidden back face shows through as small badges on the center face, like an X-ray. If you have ever fumbled with a real cube because you could not see the back, here the whole cube is always in view.
Grab any cell and slide it up, down, left, or right: the entire layer containing that row or column turns 90°, and every related cell across all six faces moves together. After scrambling, the timer starts with your first move, and it stops when all six faces become a solid color.
Never solved a cube before? No problem. Below the widget you will find a step-by-step solution guide for first-time solvers. Start in Easy mode (5 scramble moves) and follow along — you can reach your first finished cube right on this page.
How to Play#
- Turning a row: press any cell and slide it up/down or left/right. The layer containing that row turns 90°, and all related cells across the six faces move together.
- Middle rows are locked: the row/column passing through the center of each face cannot be turned. The six centers therefore never move — they define the target color of each face.
- Reading the back face: the center face is the front face, and the small square at the bottom-right of each cell shows the color of the back-face sticker directly behind that cell (think of it as an X-ray view). To turn the back layer, slide the top row of the top face (or the left column of the left face, or the bottom row of the bottom face).
- Timer and records: after pressing Scramble, the timer starts with your first move and stops when all six faces are solid. Your best time for each difficulty (Easy 5 / Normal 15 / Full 25 scramble moves) is saved in your browser.
The face layout is shown below. The top face (yellow) sits on top; the middle row holds the left face (blue), the front face (red), and the right face (green); the bottom face (white) is at the bottom, and the back face (orange) appears as the badges in the center.
Never Solved a Cube? — A Step-by-Step Guide#
Below is the most popular beginner method, the Layer-by-Layer method (LBL — completing the cube one layer at a time from the bottom), rewritten for this widget’s screen layout. Follow the seven steps in order and anyone can finish the cube. We recommend starting in Easy mode (5 scramble moves) to get comfortable with each step.
Unlike a real cube, this widget never asks you to re-grip or rotate the whole cube. The viewpoint is fixed, so “white is always down, yellow is always up” holds to the very end, and every algorithm can be followed exactly as shown on screen. With all six faces visible, it is actually easier to learn here than on a real cube.
Step 0 — Understand the Cube’s Structure#
First, a change of perspective. The cube is made of 26 pieces, not 54 stickers.
- Centers (6): the middle cell of each face. The middle rows are locked in this widget, so centers never move. Bottom = white, top = yellow, front = red, back = orange, left = blue, right = green — this layout defines each face’s target color.
- Edges (12): pieces where two faces meet. Their 2 stickers travel as one body.
- Corners (8): pieces where three faces meet. Their 3 stickers travel as one body.
A red-white edge is a red-white edge wherever it goes. You are not moving individual stickers — you are carrying pieces home, and the centers always tell you where home is. The red-white edge’s home is where the red center (front) meets the white center (bottom).
Reading Move Notation#
Algorithms are written with the initials of the six faces: U(p) / D(own) / L(eft) / R(ight) / F(ront) / B(ack). A letter alone means turning that face 90° clockwise as you look at it head-on; a trailing ' (prime) means counter-clockwise, and a trailing 2 means twice (180°).
In this widget, every symbol can be executed by dragging on just the front and top faces:
| Symbol | Meaning | Drag in the widget |
|---|---|---|
U / U' | top face CW / CCW | front face top row left / right |
D / D' | bottom face CW / CCW | front face bottom row right / left |
L / L' | left face CW / CCW | front face left column down / up |
R / R' | right face CW / CCW | front face right column up / down |
F / F' | front face CW / CCW | top face bottom row right / left |
B / B' | back face CW / CCW | top face top row left / right |
The drags in the table are just one option each. Pushing the same layer from any face gives the same result — R can be the front face’s right column pushed up, or the top face’s right column pushed up (toward the top of the screen).
An algorithm like R U R' U' is executed one symbol at a time, from left to right. Check the table for each symbol at first — your hands will memorize them soon enough.
Step 1 — The Daisy, then the White Cross#
Goal: place the four white edges around the bottom face (around the white center) in a cross. This step needs no algorithms — pure reasoning, and the best warm-up.
Sending white edges straight down tends to break the ones you already placed, so first build the daisy: gather all four white-sticker edges onto the top face (around the yellow center), like four white petals around a flower.
Collecting the daisy — find each edge with a white sticker:
- In the middle layer: turn the left/right face it sits in once to send it to the top. If a white petal already occupies the landing spot, turn
Ufirst to move an empty spot over there. - In the bottom layer, white facing sideways: turn that face once and the edge pops into the middle layer; then use the method above.
- In the bottom layer, white facing down: turn
Uto clear the spot directly above that edge, then turn that face twice to bring it straight up.
Daisy → cross: bring the petals down one at a time. Turn U until a petal’s side sticker sits over the same-color center — red over the front face, green over the right face. Once aligned, turn that face twice (F2 if red). The petal drops down beside the white center. Repeat for all four petals and the white cross is complete.
Check: the bottom face shows a white cross, and the four side stickers of the cross match the front (red), back (orange), left (blue), and right (green) centers. If you have a white cross but a side color is off, bring that edge back up (turning its face twice pops it up) and re-place it.
Step 2 — White Corners (First Layer Complete)#
Goal: insert the four white corners into their bottom-layer slots to finish the first layer.
Find a white corner in the top layer. Its other two colors name its destination: the white-red-green corner’s home is between the red center (front) and the green center (right) — the front-right bottom slot.
- Turn
Uto park the corner directly above its destination slot. - Repeat the formula for that slot until the corner clicks in (it lands on the 1st, 3rd, or 5th repetition — success means white facing down with side colors matching):
| Destination slot | Formula to repeat |
|---|---|
| front-right | R U R' U' |
| front-left | L' U' L U |
| back-right | R' U' R U |
| back-left | L U L' U' |
If a white corner is already stuck in the bottom layer in a wrong slot (or twisted), run that slot’s formula once. The corner pops out to the top layer, and you can insert it normally.
After this step the whole bottom face is white and the bottom row of every side face matches its center.
Step 3 — Middle-Layer Edges#
Goal: insert the four edges without yellow into their middle-layer slots. This finishes the bottom two layers.
Find an edge in the top layer with no yellow sticker (check both its top sticker and its side sticker; side stickers are visible on the top rows of the front, left, and right faces, or on the top row of the back-face badges).
- Turn
Uuntil the edge’s side sticker sits over the same-color center. Red → front, orange → back (the middle badge of the top badge row turns orange), green → right, blue → left. - The edge’s top sticker now tells you which slot it goes into. Imagine facing the aligned face head-on and pick from this table:
| Aligned face | Into its right slot (as seen facing it) | Into its left slot |
|---|---|---|
| front (red) | U R U' R' U' F' U F | U' L' U L U F U' F' |
| right (green) | U B U' B' U' R' U R | U' F' U F U R U' R' |
| back (orange) | U L U' L' U' B' U B | U' R' U R U B U' B' |
| left (blue) | U F U' F' U' L' U L | U' B' U B U L U' L' |
“Right” always means as seen when facing that face head-on. Viewed from above: the front face’s right-hand neighbor is the right face, the right face’s is the back face, the back face’s is the left face, and the left face’s is the front face. Example: you aligned a red-green edge on the front (red) face and its top sticker is green — the green center is to the front’s right, so use row 1’s “into its right slot” formula.
If an edge is stuck in a wrong middle slot: push any top-layer edge into that slot with the formula. The stuck edge pops out to the top layer; then proceed normally.
Step 4 — The Yellow Cross#
Goal: make a yellow cross on the top face. Ignore the side colors for now.
From here on you must protect the bottom two layers, so algorithms become essential. Fortunately this step needs only one:
F R U R' U' F'
The yellow edges on top form one of four patterns. Check the shape, align it with U if needed, and run the algorithm. It evolves in the order dot → L-shape → line → cross:
From a dot it takes 3 runs (with U re-alignment in between), from an L-shape 2, and from a line just 1.
Step 5 — Match the Cross’s Side Colors#
Goal: make the side stickers of the four cross edges match their centers.
First turn U to the position where as many edges as possible match. If all four match, this step is done. Usually exactly two match — either adjacent to each other, or opposite.
If only two match, look at where the two WRONG edges sit and pick the formula:
| Wrong edges at | Formula (then one U) |
|---|---|
| front · left | R U R' U R U2 R' then U |
| left · back | F U F' U F U2 F' then U |
| back · right | L U L' U L U2 L' then U |
| right · front | B U B' U B U2 B' then U |
If the two matching edges are opposite each other, run any formula from the table once. The position turns into the adjacent case — re-align with U and finish with the table. If you ever see fewer than two matches, likewise run any formula once and re-align.
Step 6 — Position the Yellow Corners#
Goal: send the four top-layer corners to their own positions. Ignore orientation (which way each sticker faces) — only position matters here.
A corner is “in position” when its three colors are the same — in any order — as the three center colors that meet at that spot. For example, the yellow-red-green corner belongs at the front-right top point, where the top, front, and right faces meet.
- Find the corner that is already in position (even if twisted).
- Run the formula matching that corner’s position. The other three corners trade places:
| Corner in position | Formula |
|---|---|
| front-right | U R U' L' U R' U' L |
| front-left | U F U' B' U F' U' B |
| back-left | U L U' R' U L' U' R |
| back-right | U B U' F' U B' U' F |
- Check whether all corners are now in position; if not, run the same formula once more (2 runs at most).
If no corner is in position, run any formula from the table once — a corner will fall into position, and you can proceed from there.
Step 7 — Twist the Yellow Corners (Finish!)#
Goal: twist the corners in place until every yellow sticker faces up — completing the cube.
This step works at a single spot: the front-right top corner:
- Turn
Uto bring a corner whose yellow is not facing up to the front-right top. - At that spot, run
R’ D’ R D2 or 4 times (in pairs, until the yellow sticker faces up). - Turn only
Uto bring the next wrong corner to the front-right top, and repeat. - When every corner shows yellow on top, turn
Uone last time to line up the side colors. Done! 🎉
⚠️ The most common mistake: during this process the bottom two layers will look completely wrecked. That is normal. Do not panic, and do not make any other move. Travel between corners only with
U— once the last corner is finished, the bottom layers restore themselves.
Closing Tips#
- Start in Easy mode (5 scramble moves). A 5-move scramble usually resolves within steps 1–2 — perfect for building your daisy-and-cross instincts.
- If you get stuck, press Reset and scramble again. Records are stored per difficulty, so practice freely.
- Once the seven steps feel natural, take on the timer in Full mode (25 moves). Taking over ten minutes at first is perfectly normal — every world-class speedcuber started from this same layer-by-layer method.